一、商品列表功能
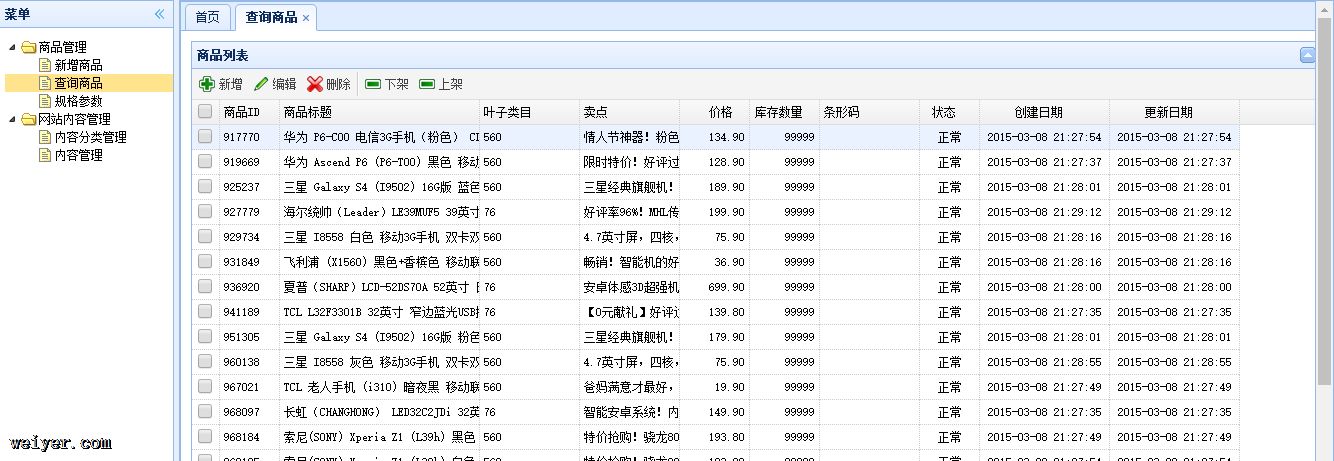
商品列表功能是后端维护购物网站的商品的功能,提供了显示、新增、编辑、删除、下架和上架功能,显示如下:
二、显示功能的实现
打开查询商品后,后端首先按照分页刷新出商品的信息,因此显示功能是第一步。
2.1 前端代码实现
前端代码的实现上主要包括界面显示和访问动作两项。界面显示采用easyui-datagrid控件实现,控件的代码如下:
<table class="easyui-datagrid" id="itemList" title="商品列表"
       data-options="singleSelect:false,collapsible:true,pagination:true,url:'/item/list',method:'get',pageSize:30,toolbar:toolbar">
    <thead>
        <tr>
            <th data-options="field:'ck',checkbox:true"></th>
            <th data-options="field:'id',width:60">商品ID</th>
            <th data-options="field:'title',width:200">商品标题</th>
            <th data-options="field:'cid',width:100">叶子类目</th>
            <th data-options="field:'sellPoint',width:100">卖点</th>
            <th data-options="field:'price',width:70,align:'right',formatter:TAOTAO.formatPrice">价格</th>
            <th data-options="field:'num',width:70,align:'right'">库存数量</th>
            <th data-options="field:'barcode',width:100">条形码</th>
            <th data-options="field:'status',width:60,align:'center',formatter:TAOTAO.formatItemStatus">状态</th>
            <th data-options="field:'created',width:130,align:'center',formatter:TAOTAO.formatDateTime">创建日期</th>
            <th data-options="field:'updated',width:130,align:'center',formatter:TAOTAO.formatDateTime">更新日期</th>
        </tr>
    </thead>
</table>
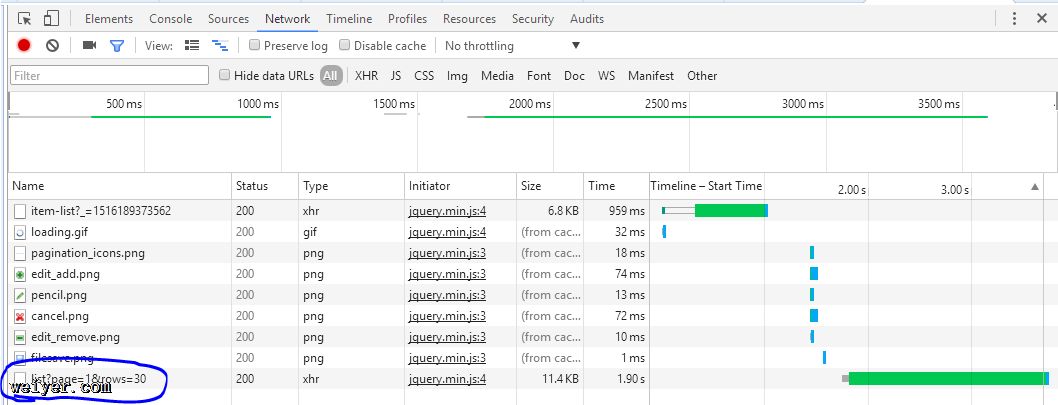 控件附带的动作为“GET”,url为“/item/list”,且附带参数为“page=1&rows=30”
页数随着数据网格下方的页码变化,前端发生翻页动作时,向后端重新发送请求,这需要后端进行处理。
2.2 后端代码实现
与前端代码对应,后端需要对“/item/list?page=1&rows=30”的url做出相应,分为如下步骤:
1. 在priv.ality.common中创建pojo对象,用于定义EasyUIDataGrid的数据对象,数据获取和更新时都会用到。
package priv.ality.utils;

import java.util.List;

public class EasyUIDataGridResult {
    private long total;
    private List rows;
    public long getTotal() {
        return total;
    }
    public void setTotal(long total) {
        this.total = total;
    }
    public List getRows() {
        return rows;
    }
    public void setRows(List rows) {
        this.rows = rows;
    }
}
该类中包含了EasyUIDataGrid中需要用到的数据和数据长度。
2. 在priv.ality.service.ItemService中声明数据更新方法getItemList
package priv.ality.service;

import priv.ality.pojo.TbItem;
import priv.ality.utils.EasyUIDataGridResult;

import java.util.List;

public interface ItemService {
    TbItem getItemById(Long itemId);
    EasyUIDataGridResult getItemList(int page, int rows);
}
3. 在priv.ality.service.impl.ItemServiceImpl类中添加方法的实现:
@Override
    public EasyUIDataGridResult getItemList(int page, int rows) {
        //分页处理
        PageHelper.startPage(page, rows);
        //执行查询
        TbItemExample example = new TbItemExample();
        List list = itemMapper.selectByExample(example);
        //取分页信息
        PageInfo pageInfo = new PageInfo<>(list);
        //返回处理结果
        EasyUIDataGridResult result = new EasyUIDataGridResult();
        result.setTotal(pageInfo.getTotal());
        result.setRows(list);

        return result;
    }
该方法使用了PageHelper库提供Mybatis的分页功能,并使用EasyUIDataGrid对象作为返回值返回给DataGrid控件,由控件进行抽取和
4. 在priv.ality.controller中添加对URL“/item/list”的处理
    @RequestMapping("/item/list")
    @ResponseBody
    private EasyUIDataGridResult getItemList(Integer page, Integer rows) {
        return itemService.getItemList(page, rows);
    }
controller中通过调用itemService中的getItemList方法提供数据完成功能。
三、新增功能
商品列表除了基本的显示功能之外,还提供数据的增删查改,有一个工具栏“商品列表”用以提供快捷操作:

商品列表的源码如下:
var toolbar = [{
        text:'新增',
        iconCls:'icon-add',
        handler:function(){ ; }
    },{
        text:'编辑',
        iconCls:'icon-edit',
        handler:function(){ ; }
    },{
        text:'删除',
        iconCls:'icon-cancel',
        handler:function(){ ; }
    },'-',{
        text:'下架',
        iconCls:'icon-remove',
        handler:function(){ ; }
    },{
        text:'上架',
        iconCls:'icon-remove',
        handler:function(){ ; }
    }];
当前代码只包含了显示样式,本篇文章只涉及“新增功能"
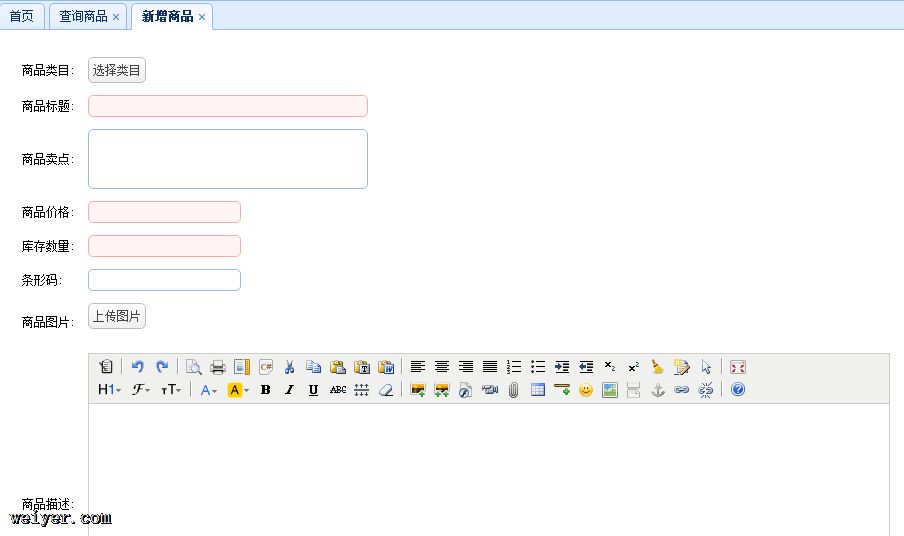
新增功能与Menu-Tree中的功能保持一致,当点击“新增”按钮时,页面跳转到“新增商品”页面:
跳转过程的代码(即“商品列表”中“新增”工具的代码)如下:
    {
        text:'新增',
        iconCls:'icon-add',
        handler:function(){
        	$(".tree-title:contains('新增商品')").parent().click();
        }
    }
$(".tree-title:contains('新增商品')").parent().click();
如上提供了跳转到“新增商品”的操作,下面分析该操作。
“新增商品”页见上,页面主要实现的内容有:
1. 商品类目的选择2. 商品标题、价格和数量的必选项设置3. 商品图片的上传4. 富文本商品描述
首先给出新增商品页的布局代码:
<p style="padding:10px 10px 10px 10px">
    <form id="itemAddForm" class="itemForm" method="post">
        <table cellpadding="5">
            <tr>
                <td>商品类目:</td>
                <td>
                    <a href="javascript:void(0)" class="easyui-linkbutton selectItemCat">选择类目</a>
                    <input type="hidden" name="cid" style="width: 280px;"></input>
                </td>
            </tr>
            <tr>
                <td>商品标题:</td>
                <td><input class="easyui-textbox" type="text" name="title" data-options="required:true" style="width: 280px;"></input></td>
            </tr>
            <tr>
                <td>商品卖点:</td>
                <td><input class="easyui-textbox" name="sellPoint" data-options="multiline:true,validType:'length[0,150]'" style="height:60px;width: 280px;"></input></td>
            </tr>
            <tr>
                <td>商品价格:</td>
                <td><input class="easyui-numberbox" type="text" name="priceView" data-options="min:1,max:99999999,precision:2,required:true" />
                    <input type="hidden" name="price"/>
                </td>
            </tr>
            <tr>
                <td>库存数量:</td>
                <td><input class="easyui-numberbox" type="text" name="num" data-options="min:1,max:99999999,precision:0,required:true" /></td>
            </tr>
            <tr>
                <td>条形码:</td>
                <td>
                    <input class="easyui-textbox" type="text" name="barcode" data-options="validType:'length[1,30]'" />
                </td>
            </tr>
            <tr>
                <td>商品图片:</td>
                <td>
                     <a href="javascript:void(0)" class="easyui-linkbutton picFileUpload">上传图片</a>
                     <input type="hidden" name="image"/>
                </td>
            </tr>
            <tr>
                <td>商品描述:</td>
                <td>
                    <textarea style="width:800px;height:300px;visibility:hidden;" name="desc"></textarea>
                </td>
            </tr>
            <tr class="params hide">
                <td>商品规格:</td>
                <td>

                </td>
            </tr>
        </table>
        <input type="hidden" name="itemParams"/>
    </form>
    <p style="padding:5px">
        <a href="javascript:void(0)" class="easyui-linkbutton" onclick="submitForm()">提交</a>
        <a href="javascript:void(0)" class="easyui-linkbutton" onclick="clearForm()">重置</a>
    </p>
</p>
下面依次对四个方面进行实现。
四、新增功能的实现
4.1 商品类目
前端代码
商品类目的前端布局代码如下:
       <tr>
    <td>商品类目:</td>
    <td>
        <a href="javascript:void(0)" class="easyui-linkbutton selectItemCat">选择类目</a>
        <input type="hidden" name="cid" style="width: 280px;"></input>
    </td>
</tr>
该布局中“选择商品”的属性为“easyui-linkbutton”,该按钮并没有注册OnClick事件,而是注册一个为“selectItemCat”的样式,该样式由/js/common.js中,定义如下:
// 初始化选择类目组件
initItemCat : function(data){
    $(".selectItemCat").each(function(i,e){
        var _ele = $(e);
        if(data && data.cid){
            _ele.after("<span style='margin-left:10px;'>"+data.cid+"</span>");
        }else{
            _ele.after("<span style='margin-left:10px;'></span>");
        }
        _ele.unbind('click').click(function(){
            $("<p>").css({padding:"5px"}).html("<ul>")
            .window({
                width:'500',
                height:"450",
                modal:true,
                closed:true,
                iconCls:'icon-save',
                title:'选择类目',
                onOpen : function(){
                    var _win = this;
                    $("ul",_win).tree({
                        url:'/item/cat/list',
                        animate:true,
                        onClick : function(node){
                            if($(this).tree("isLeaf",node.target)){
                                // 填写到cid中
                                _ele.parent().find("[name=cid]").val(node.id);
                                _ele.next().text(node.text).attr("cid",node.id);
                                $(_win).window('close');
                                if(data && data.fun){
                                    data.fun.call(this,node);
                                }
                            }
                        }
                    });
                },
                onClose : function(){
                    $(this).window("destroy");
                }
            }).window('open');
        });
    });
},
该样式类selectItemCat使用each对所有绑定该事件的样式循环初始化,在该类首先对click事件进行解绑,然后绑定方法function:
              $("<p>").css({padding:"5px"}).html("<ul>")
window({
width:'500',
   height:"450",
   modal:true,
   closed:true,
   iconCls:'icon-save',
   title:'选择类目',
   onOpen : function(){
    var _win = this;
    $("ul",_win).tree({
        url:'/item/cat/list',
        animate:true,
        onClick : function(node){
            if($(this).tree("isLeaf",node.target)){
                // 填写到cid中
                _ele.parent().find("[name=cid]").val(node.id);
                _ele.next().text(node.text).attr("cid",node.id);
                $(_win).window('close');
                if(data && data.fun){
                    data.fun.call(this,node);
                }
            }
        }
    });
   },
   onClose : function(){
    $(this).window("destroy");
   }
).window('open');
该动作创建并打开一个模态窗口,该窗口的打开动作中进行AJAX请求向服务器请求数据,并将数据填充到easy-ui的异步树形控件中,设定url为'/item/cat/list',这也需要服务器端对该URL进行相应。
easy-ui中的异步tree控件初始化时首先读取当前树的节点,当展开一个封闭的节点时如果节点未曾加载,则在url中添加请求参数:节点ID,然后向服务器发起请求,服务器端进行相应时为JSON数据,且具备结构要求:
[{
    "id": 1,
    "text": "Node 1",
    "state": "closed"
 }
{
    "id": 2,
    "text": "Node 2",
    "state": "closed"
 }
]
state的值要求如下:如果当前节点为父节点,state应为“closed”、如果是叶子节点则应该为“open”。
前端代码分析完毕,对于JQuery的API熟练度不够,还没发自己写出来一个=_=!
后端代码
1. 创建EasyUITreeNode这个pojo对象
EasyUITreeNode用于定义树形节点的各个节点数据,由于类比较基础,放置在ality-common工程中:
public class EasyUITreeNode {

	private long id;
	private String text;
	private String state;
	public long getId() {
		return id;
	}
	public void setId(long id) {
		this.id = id;
	}
	public String getText() {
		return text;
	}
	public void setText(String text) {
		this.text = text;
	}
	public String getState() {
		return state;
	}
	public void setState(String state) {
		this.state = state;
	}
}
2. 创建ItemCatService接口,代表商品添加相关的服务
package priv.ality.service;

import priv.ality.utils.EasyUITreeNode;

import java.util.List;

public interface ItemCatService {
    public List getItemCatList(long parentId);
}
该服务的方法getItemCatList使用参数parentId对应前端分析的url中带来的参数,返回值为EasyUITreeNode的List对象。
3. 创建该接口的实现ItemCatServiceImpl:
package priv.ality.service.impl;

import org.springframework.beans.factory.annotation.Autowired;
import priv.ality.mapper.TbItemCatMapper;
import priv.ality.pojo.TbItemCat;
import priv.ality.pojo.TbItemCatExample;
import priv.ality.service.ItemCatService;
import priv.ality.utils.EasyUITreeNode;

import java.util.ArrayList;
import java.util.List;

public class ItemCatServiceImpl implements ItemCatService {
    @Autowired
    private TbItemCatMapper itemCatMapper;

    @Override
    public List getItemCatList(long parentId) {
        // 根据parentId查询分类列表
        TbItemCatExample example = new TbItemCatExample();
        //设置查询条件
        TbItemCatExample.Criteria criteria = example.createCriteria();
        criteria.andParentIdEqualTo(parentId);
        //执行查询
        List list = itemCatMapper.selectByExample(example);
        //转换成EasyUITreeNode列表
        List resultList = new ArrayList<>();
        for (TbItemCat tbItemCat : list) {
            //创建一个节点对象
            EasyUITreeNode node = new EasyUITreeNode();
            node.setId(tbItemCat.getId());
            node.setText(tbItemCat.getName());
            node.setState(tbItemCat.getIsParent()?"closed":"open");
            //添加到列表中
            resultList.add(node);
        }
        return resultList;
    }
}
该实现中使用Example对象和Criteria对象设置查询条件,获取了ParentId等于入参的所有结果,并按照异步Tree要求的格式进行封装后返回结果。
4. 在Controller中添加方法接受参数并返回结果(JSON数据)。
package priv.ality.controller;

import org.springframework.beans.factory.annotation.Autowired;
import org.springframework.stereotype.Controller;
import org.springframework.web.bind.annotation.RequestBody;
import org.springframework.web.bind.annotation.RequestMapping;
import org.springframework.web.bind.annotation.RequestParam;
import org.springframework.web.bind.annotation.ResponseBody;
import priv.ality.service.ItemCatService;
import priv.ality.utils.EasyUITreeNode;

import java.util.List;

@Controller
@RequestMapping("/item/cat")
public class ItemCatController {
    @Autowired
    private ItemCatService itemCatService;

    @RequestMapping("/list")
    @ResponseBody
    public List getItemCatList(@RequestParam(value="id",defaultValue = "0")Long parentId){
        return itemCatService.getItemCatList(parentId);
    }
}
功能完成结果如下:
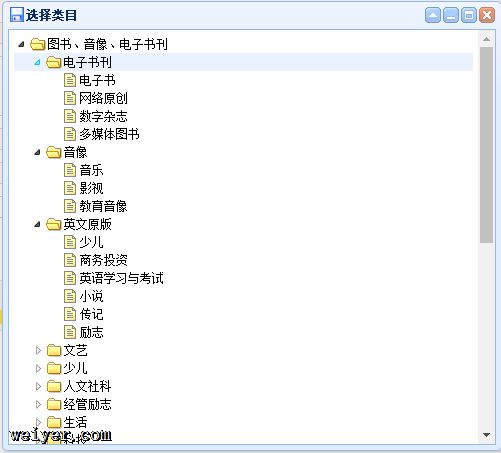
如上可见,商品类目选择功能已经得到实现。
ps:入职新公司,技术栈发生变更,由JavaWeb转大数据方向,语言转向Ruby和Node.js,所以下面就暂时暂停更新这个系列的文章啦,有的闲工夫再来~
