对于flexgrid,可以直接在单元格内进行编辑。但另外还有一种编辑方式,即在一行添加按钮,统一的编辑和提交数据。本文主要介绍给flexgrid添加编辑按钮列,并通过编辑按钮设置编辑。
在上一篇自定义编辑器中,我们介绍了如何自定义编辑器,主要使用的就是itemFormatter功能。在本文中,我们依然要使用这个itemFormatter功能设置编辑列。
创建buttons列
在flexgrid的columns中创建列,用来添加按钮,代码参考:
columns: [
{ header: 'ID', name: "id", binding: 'id', width: '*' },
{ header: 'Date', name: "date", binding: 'date', width: '*' },
{ header: 'Country', name: "country", binding: 'country', format: 'n0', width: '*' },
{ header: 'Population', name: "population", binding: 'population', width: '*' },
{ header: 'Buttons', binding: "buttons", name: "buttons", width: '*' }],
初始化
通过itemFormatter初始化显示按钮。设置单元格元素的innerHTML,让单元格显示按钮,使用JS代码拼了HTML的字符串,代码参考:
html = '
' + ' ' + '' + '
';逻辑判断
在本文里,设置了editIndex,用来记录单元格的编辑状态情况。当点击Edit按钮后,会调用editRow方法,改变editIndex,并且本行的单元格进入编辑状态。代码参考:
function editRow(row) {
editIndex = row;
flex.invalidate();
}
点击按钮后,通过改变innerHTML,改变本列按钮的显示,本列按钮显示成commit和cancel。代码参考:
html = '<p>' +
' ' +
'<button class="btn btn-primary btn-sm" onclick="commitRow(' + r + ')">' +
'<span class="glyphicon glyphicon-ok"></span> OK' +
'</button>' +
' ' +
'<button class="btn btn-warning btn-sm" onclick="cancelRow(' + r + ')">' +
'<span class="glyphicon glyphicon-ban-circle"></span> Cancel' +
'</button>' +
'</p>';
点击commit按钮会提交数据,代码参考:
function commitRow(row) {

// save changes
flex.setCellData(row, 'date', inputDate.value);
flex.setCellData(row, 'country', $("#theCountry").val());
flex.setCellData(row, 'population', inputPopulation.value);

// done editing
cancelRow(row);

//Get the updated values in collection view.
var cv = flex.collectionView;
}
点击cancel按钮,会取消修改,代码参考:
function cancelRow(row) {
editIndex = -1;
flex.invalidate();
}
至此,就完成了InlineEdit的编辑。根据本文中的示例,可以通过Edit按钮进行整行编辑,并且修改后,通过commit提交数据,通过cancel取消提交数据。
在之前的文章中,我们介绍了itemFormatter的用法,实现了自定义Editor以及InlineEdit。本文就在之前的基础上,介绍如何使用itemFormatter来实现格式化单元格。
对于flexgrid,当输入了内容,我们期望根据内容的不同进行格式化。在itemFormatter中,我们可以获取到四个参数:panel、c、r、cell。通过panel.getCellData方法可以拿到单元格的数据。校验是不是需要格式化的列以及设置格式化代码,请参考:
// validate CellType and if correct column
if (wijmo.grid.CellType.Cell == panel.cellType &&
panel.columns[c].binding == 'amount') {

// get the cell's data
var cellData = panel.getCellData(r, c);

// set cell's foreground color
cell.style.color = getAmountColor(cellData);
}
在这里,调用getAmountColor方法来判断不同值采用不同的颜色。代码参考:
// get the color used to display an amount
function getAmountColor(minfloor) {
return minfloor < 1000 ? 'blue' : minfloor < 6000 ? 'black' : 'red';
}
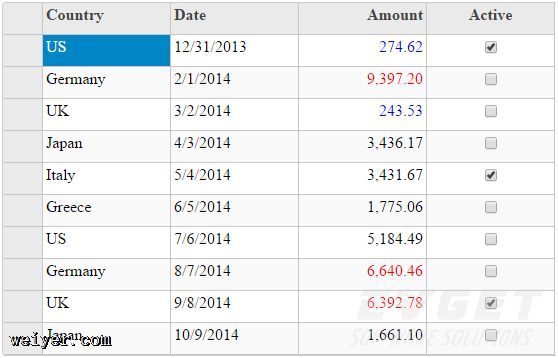
初始化,对值得格式化,效果如下:

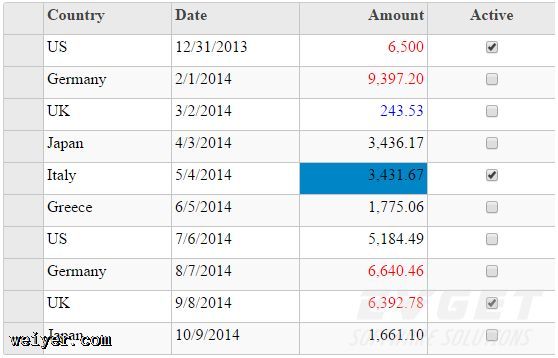
进入编辑状态,修改Amount列的单元格的值,颜色会随着值做格式化。比如修改第一行的Amount列的值为6500,效果变成如下:


